Sewing Scraps

Tuesday, March 26, 2019

Little Ruby 4 Patch - Square in a Square

How cute is this square in a square quilt?  It may look complicated but it is very forgiving because you trim ... and then trim again. Here is what my starting pile looked like below.  
There are two names for this block - square in a square or the economy block.  Here are the sizes and techniques I did for making this quilt.  Lots of pictures to share but shown in different fabrics since I ran out of Little Ruby to demonstrate.
I cut all my scraps into 2 1/2" x 2 1/2" squares - or made them that size by sewing a few pieces together. (see below)
All squares were sewn together into a 4 patch with two similar patterns per block if possible. The important thing is to make sure the center points look good in the middle. The outside edges can be wonky since all 4-patch blocks will be trimmed to 4" x 4" unfinished.
3 3/4" x 3 3/4" squares are cut out of the background fabric.  Then sliced on the diagonal into triangles.  Finger press the triangles to create a little crease - wrong sides together.
Lay your triangle with the little crease, right sides together on a seam on the 4-patch. I have a little blue line marked on the wrong side that shows you where the crease is in the pix below. The crease kind of nestles into the seam and easily lines up your center point.  If you made the crease with right sides together it would create a little 'bump' and not lay flat when you sew. 
Sew two triangles on opposite sides of your 4 patch.  Don't call the quilt police because I am not sure if this is the 'right' thing to do - BUT I always flip my units over and trim off the little 'ears'.  Now press open the seams and do the whole thing all over again on the remaining sides. (pix below - the blue marks are only to show where the crease/fold lines are for this post)
You now have another lovely wonky block.  No worries.  Press seams open and trim again. How you do this final trim is up to you - whether it's with a square ruler or on your cutting mat. The final size you are aiming for is 5 1/2" x 5 1/2" unfinished.
I enjoy using Deb Tucker rulers where her technique is to make over sized units and trim down.  She has two rulers that do this for a Square in a Square.  One template is for sizes 1" - 6", and then a 2-ruler set that makes sizes 1" - 12".  The link is here.
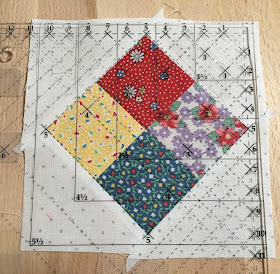
I positioned the Square in a Square ruler with the dotted lines on my 4 patch - lining it up with the number 5 on all the points. There is little waste and the 4-patch is nicely centered.  Trim to 5 1/2" x 5 1/2".
The rest was pretty fun - laying out the squares all in rows.  Nothing on the diagonal and all straight stitching.
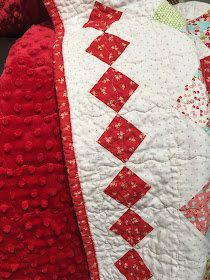
The same technique and same size was done for the red 'diamonds' on the side.  The only reason it looks different is because this 4 patch is made with two red and two background squares.  
When the background fabric is used as part of the 4 patch - the dominant color creates a nice pretty diamond effect.
Quilting was done with wavy lines in Aurifil 50wt. white #2024 on the top and red #2265 in the bottom bobbin.
There was one little snag that disappointed me with this quilt. The minky was pre-washed a few times and I can't remember if the Little Ruby was way back in 2017.  But even with Shout Catchers there is a slight pink tinge to the background fabric. 

This quilt is solid proof that while I may see a 'pinkish' flaw - the sentiments and thoughts for making this quilt in the first place are what's important.  It's with great joy I gift another quilt to someone new - a lovely lady called Barbara - so she can snuggle up and enjoy  something made especially for her.

Materials:
Little Ruby / Bonnie & Camille / Moda
Modern Background Paper / Zen Chci / Pin Dot - Silver white
Red dimple dot minky
Warm & White batting
Aurifil 50wt. #2024 & #2265
Deb Tucker Square Squared Ruler
Size: 45.5" x 45.5"
March 2019

Friday, March 15, 2019

Modern "True Blue" Half Rectangle Quilt (#105)

After months of looking for something "mid century modern" I found the perfect fabric called True Blue by Zen Chic. The color palette and the shape of the 'split rectangle' or 'half rectangle triangles' were ideal.
I really like the templates by Deb Tucker (web site here) - and her video instructions here
Her approach to quilt blocks is to make over sized units and trim to size. Deb Tucker's videos are my teaching tools and I am super happy with the final results.
Stats for this quilt are:
1)   Cut fabric 7" wide
2)   Choose which way you want the diagonal to go and cut fabric accordingly.  How you cut the fabric is the key to versatile half rectangle quilts.
My half rectangles for this quilt were cut with the fabric wrong side up.
3)  Sew 2 half rectangles together
4)   Trim the rectangle unit to 3.5" x 6.5" using the same Deb Tucker template. (This ruler makes 8 size options all the way from a tiny 1/2" x 1" ... to a large ... 4" x 8".)
I did pre-wash & starch the fat quarters.  Trimming on a rotating mat is so helpful and seeing those accurate split rec units was wonderful.  This quilt is 58" x 73" and has 19 split rec units across - with 12 rows down.
Quilting is straight stitching on either side of the seam lines - vertical, horizontal and diagonal.  Aurifil 50wt. #2600 thread (Dove) on top and this super grey/blue #1248 on the bottom.  Perfect thread every time to use for piecing and quilting with minky.  The backing is dimple dot minky also called "Dove" from Hawthorne Threads
My first quilt using this ruler is shown above.  The blog post about it is here. The ONLY difference between that diamond quilt and this modern blue quilt is how the fabric is cut. The diamond look is achieved by cutting fabric rectangles with right sides and wrong sides up.  This single direction diagonal quilt was cut with all fabric wrong side up. (If you would like all the diagonals to go the other way - you would cut all your fabric right sides up). 
 I found this True Blue fabric by Brigitte Heitland for Moda at a lovely on-line store called Stash Addict Quilts based outside of Seattle WA.  I have found many hard to find bundles (and yardage) there and they are truly worth adding as a fabric source. Their staff is nice too!
Lastly, I am not compensated for any of the tools or places I shop but think it's worth recommending rulers that work and shops that are hidden gems.

Materials:
True Blue from Zen Chic / Brigitte Heitland / Moda
Warm & White batting
Aurifil 50wt. thread #2600 and #1248
Binding: Cotton Couture Midnight / Michael Miller
Deb Tucker Split Rects ruler
Hawthorne Threads dimple dot minky / Dove
Size: 58" x 73"
March 2019

Thursday, March 7, 2019

"Cheater Quilts" with Floral Pets

Some novelty fabrics are just too cute to cut up - enter Floral Pets by Mia Charro (read more about Mia here). 
 It was time to make a few 'cheater quilts" with the cutest dogs and cats ever and coordinating flower borders. 
A cheater quilt features fabric designed and printed to look like patchwork or applique. All you have to do is quilt and bind. A cheater quilt can also be a panel or isolated image - the choices are endless.  Basically - you don't cut up and sew back together!
I pre-washed the panels (the dog & cat yardage), and they did shrink and slightly skew.  I was not fussy and straightened them up as best I could. But this video from Laura Ann Coia of Sew Very Easy has a wonderful tutorial on how to Square up a Quilt Panel.
It was a great time to pretend stitching in the 'ditch' - something I never get to do since I press my seams open.  
The same rules apply to cheater quilts - starch, iron and have fun.  I loved using a bright Aurifil 50wt. #2220 (light salmon) on all the quilts ( I made 3), and straight stitching lots of grids.  
For each quilt I bought 1.25  yards of pet fabric for the inside and 1.5 yards for the border & binding. (Note: when I made these Floral Pets was sold as yardage not panels.  Each panel now sold from Hawthorne Supply Co. has 4 rows of rectangles.  I have 7 rows in my quilts - so 2 panels should be perfect to make this sized quilt).

The border fabric was cut at 6.75" and then attached.   2 yards of fun bright minky for each quilt and I was good to go!
Tip:  Since your binding will come out of the boarder fabric, cut binding first. Play around with some numbers.  Estimate how big your quilt will be with a border 'this many inches' - and cut your binding to fit that size. Even if you make a mistake or have to fudge a little on the border - you absolutely will have enough binding.  
Note: I really wasnt thinking when I pre-washed that the panel would go wonky. I just didn't want the cute animal faces to be too crinkly when the quilt was finished.  Maybe on the next cheater quilt I will not pre-wash ... but since this fabric had a big grid - a little trimming was no big deal. 
These were very fun to make and if you leave off the wide border - super easy and approachable for a beginning project. A small cheater quilt is also a great way to make a minky quilt for those of you who are a little hesitant of jumping into that fluffy world of minky!

Materials:
Floral Pets by Mia Charro / Blend Fabrics
Dimple dot minky : Shell & Coral from Hawthorne Threads
Aurifil 50wt. #2220 (light salmon)
Warm & White batting
Size: 50" x 53"
March 2019