Monday, July 19, 2021

Scrap Half Square Triangle Quilt - with Text!

Although this quilt looks complicated - it's really a "two color quilt".  One side is text fabric, the other ... scraps!
Using the AccuQuilt Half Square 2" Finished Triangle die to cut all the fabrics - it was super fun sewing a HUGE pile of little squares. 
An alternative method is to rotary cut using a template like this one which I use when I snowball a corner.   This blog post explains one way to use the Folded Corner Clipper, along with some video links: HERE.
There are 1,980 pieces in the quilt top but just pace yourself, take your time - and think of this as a long term project that is something easy to pick up and leave. Or, make a small quilt just for the enjoyment of sewing little pieces fast & furious!
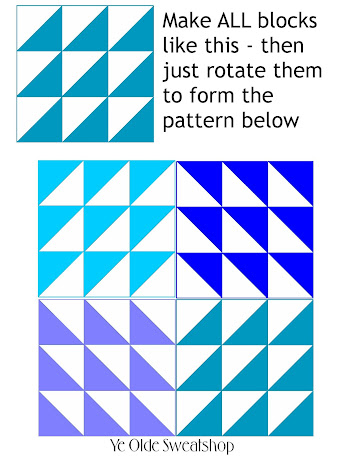
Make all your blocks with the diagonal going the same way - 3 half square triangles across.  Sew three rows together and start again.   (The top square in the diagram.) 
Lay 4 blocks out - rotating each one to form a 'white' or 'text' diamond in the center.  Sew together and trim to 12" x 12".
My blocks were not square due to a multitude of bad ironing habits (steam, ironing every which way, etc.) - and since I wanted the final assembly to be a happy experience and not a 'hair tearing out experience" - everything was trimmed to the same size - regardless what got chopped off! This was a fun, non-perfect scrappy quilt and definitely not a heirloom item! 
There are 30 HST units across & 33 HST units down.  With this 'design' your numbers should be divisible by 3 - since your base unit is 3 half square triangles.  Over the months (maybe years), I didn't realize how big the top was getting.  So, to finish this journey I took all the remaining misfit pieces, sewed them together with no regard to the original pattern and attached them to the sides to make things even.  Quilt finished. 
This blanket is my quilt life flashing before my eyes.  10 years of projects rolled into one quilt with a rainbow of colored fabrics softened by various text designs.  I liken this quilt to finger painting - tons of enjoyment with lots of messy bits!

Materials:
Text fabric / Scraps
AccuQuilt Half Square Triangle - 2" Finished Square-Multiples
     #55063
Backing:  Fairy Frost /  Michael Miller 
Warm & White batting 
Aurifil 50wt. thread #2311 & #1248
Size: 58.5" x 64" 
July 2021

Wednesday, July 14, 2021

Granny Square Quilt in Retro Fabrics

For those who like little squares this is a super fun project.  Half design/craft camp, half sewing.  I have a tutorial for making a Granny square quilt with 3.5" squares (here) and how to make a design board with 2.5" squares (here).
This quilt was made 'by the book' using the Great Granny Squared by Lori Holt.  Lots of pictures and very clear directions and for $13 it doesn't break the bank.  
I decided to cut all my squares in retro fabrics so I could make a variety of vintage themed little quilts.  All these squares were cut using a rotary cutter and the AccuQuilt Square 2.5" die (#55059).

Starching and ironing makes handling all these little pieces easier: like nice crisp paper that doesn't flop! Sashing strips are 2.5" wide and the cornerstones are 2.5" x 2.5" squares.  
The 'inside' portion of the quilt made with the Granny Squares measures 40" x 40". Dark shot cotton in Denim blue is the border fabric and that was cut at 4" wide before sewing. 
Solid blue is the backing with simple wavy line quilting on the sashing seams and through the squares.  Lastly, a nice indigo striped binding completes this little quilt going to a 4th of July baby!  

Materials:
Great Granny Squared book by Lori Holt
Retro 30's fabrics from Lecien and Darlene Zimmerman
Shot Cotton in Blue Jean/Denim / Kaffe Fassett
White Kona
Cotton Couture in Midnight / Michael Miller
Warm and White batting 
Indigo Candy Stripe binding from Hawthorne Supply Co.
Aurifil 50wt. thread # 2311 (muslin) #2740 (blue)
AccuQuilt Square Die 2.5" unfinished - #55059 
Size: 47.5" x 47.5"
July 2021

Monday, July 5, 2021

Scrap Log Cabin Quilt ... Tilda Style

The 100 piece Tilda Bit by Bit Stash Builder from Serendipity Woods was a joy to play with. A treasure trove of fat 16ths made The Cleo Quilt (here) and this very fun scrappy log cabin. These little fabric pieces gave all the color and variety one could wish for.
Let's begin:  The tutorial for this block is from Red Pepper Quilts here.  Rita Hodge is renown for her lovely and precise sewing and in this tutorial she gives all the cutting instructions and a diagram that will build your block up to 8.5" x 8.5". 
After reaching that 8.5" block - I added one more round with my widest scraps - and if they were too short - sewed two or three pieces together to get the proper length.  I then measured my smallest log cabin block and trimmed all 9 units to that size which was 14" x 14". 
Next came the sashing cut at 2.5" unfinished and some 2.5" x 2.5" cornerstones.  The final part was  simple quilting with a wavy line following some of the seams, left to right and up and down.  
This was made for a friend who adores blue and of course, who doesn't love Free Fall by Tula Pink - so that is the backing. 
The stripped binding tops off this very colorful scrap quilt.  I learned a lot during the last month as I went through all my quilt projects and organized my sewing room (aka the garage).  I really enjoyed the variety and quantity of this Bit by Bit Stash Builder Bundle. Not too overwhelming and two small quilts used up pretty much all the fat 16ths ... it felt good not to have loads of leftovers!  Most importantly - to pace myself with all the projects that I have started and not feel guilty that they will take a long time to finish.  
Materials: 
Tilda Bit by Bit Stash Building from Serendipity Woods
Free Fall in Navy by Tula Pink
Navy candy stripe binding from Hawthorne Supply Co.
Shot Cotton in Denim by Kaffe Fassett
Warm and White batting 
Aurifil 50 wt. thread #5118 and #2720
Tutorial from: Red Pepper Quilts
Size:  49" x 49" 
July 2021

Monday, May 31, 2021

Mini Design Board for Granny Squares

I have an extreme love of small squares - perfect for making the Granny Square block. There are so many free tutorials on-line for a variety of methods with square sizes ranging from 1.5" to 3.5".  
This is how I lay out the design portion of my Granny Squares, which for this project are 2.5" squares.
Let's begin to transform a spare piece of foam core into a mini design board. 
1.)  Decide how many 'rounds' your Granny Square has.  Mine has 4 'rounds' plus the background fabric. 

2.)  Decide how big your unfinished squares will be.  Mine are 2.5" 
3.)  Count the longest row of squares -  and multiple by the size of your unfinished square.
My longest row is 7 squares x 2.5" = 17.5" 
So - my piece of foam core (or stiff cardboard) must be at least 17.5" x 17.5" to layout my squares and not fall off the edges!
4.) Take a scrap of batting and tape it to the foam core on the back, nice and tight.  
5.)  Mark the squares according to your square size.   I write on the batting how many granny squares of each fabric I will need.   
Example: 2nd row needs 4 units, 3rd row need 8 units and the last row needs 12 units.
6.)  Put the cut squares on your  mini design board and take a picture in case they happen to fall  off or you forget the pattern.  Lastly, add the background squares or rectangles according to what method you like when you sew everything together. 

The rest is up to you depending what tutorial you are following.  The biggest discrepancy for most tutorials is how to cut those outside 'background' squares and/or rectangles.  But no matter which technique you choose for your background square sizes - the inside design portion is done and you have a nice visual of what the finished block will look like.  It's craft camp for those of us who love small squares!

Thanks to these sources for their tutorials on how to make a Granny Square block:
and there are lots of YouTube videos as well if you are curious to explore

Materials:
Great Granny Squared  book by Lori Holt
Foam Core or cardboard/batting/measuring tape
May 2021

Tuesday, May 25, 2021

A Change Ahead ...

Hello Friends - Many thanks to those who have signed up using the new SUBSCRIBE button. 

I will be using a new email service June 1st.

If you would like to continue receiving emails notifications when I write a blog post - please enter your information in the new SUBSCRIBE box at the top of the blog page.

I hope you will continue to follow me 
Thanks so much, 
Ruth

Visit me on Instagram : #yeoldesweatshop

Saturday, May 15, 2021

Quilt as You Go Hexies - In Progress

I am beginning to think that I may not be cut out for hexies - even the large ones. I made some more this week after ignoring my little pile for months.  Threw them all on a table and realized I am not even close to a small quilt ... oh dear!   Anyway, here are some recent pictures and refresher tips.  
The template and tutorial are from the Missouri Star Quilt Co. under Quilt As You Go.  I also have information from an earlier blog post in 2019 HERE.
Of course, cut out your fabric and batting ahead of time.  Trace the inside of the template with a pencil or fabric pen in the shape of the smaller hexie.  Glue a piece of batting in that outline and press with an iron.  Glue a smaller fabric hexie and place it on same sized batting and iron as well.  (see pics below)

** I use a can of fabric basting spray or a fabric glue stick for this part and ALWAYS use the glue on the fabric - not the BATTING.  You don't need much spray baste - just enough to make it tacky in the center before you stick and iron.

Next, put some glue on the back hexie - not right up to the batting, just a little under.  Finger press a seam with a little room between batting - and then fold up again.  Press with a hot iron.
Work your way around the hexie going one direction, ironing at every stage to keep things flat.  When you get to the end - your hexie should look like the picture above.
Fold over that last seam, iron - and then sew on the machine with a stitch length you like (I use a 2.40) all the way around.   Back tac at the beginning and the end, just to make sure everything is tight and not going to come apart.  

The glue I use is Roxanne Glue Baste It (temporary basting glue) with a small metal tip.  Here is blog post from Suzy Quilts that answers any glue questions, including using washable white school glue. 
Final thought - I thought this was going to be my forever quilt - not take me forever!

Materials:
Quailt As You Go Hexagon Template from Missouri Star Quilt Co. 
Amy Butler - everything
Aurifil Thread #50 wt. #2024 white
Warm & White batting scraps
Roxanne Glue Baste Glue & Collins Fabric Glue Stick
May 2021

Tuesday, May 4, 2021

The Cleo Quilt and Tilda Fabrics

I saw this pattern from Kitchen Table Quilting and knew it was the perfect fit for my Tilda fabric scraps. It's called The Cleo Quilt. Yes, the resolve to not get any more fabric flew out the window when I saw this offering from Serendipity Woods: 100 different scrappy fat 16ths of Tilda fabrics.
While I can't share the particulars of this pattern since it is all the work of Erica of Kitchen Table Quilting - here are some observations.  The pattern is confident beginner.  You can make your quilt scrappy & smaller (like I did) - or as complicated as you like because Erica offers coloring pages.  Layout and specs are written for 3 sizes, but it is very easy to make custom if you wish.   And best of all - you trim all your units to size.  I love a pattern that lets you trim down to a perfect size!
I can see myself using this pattern many times with multiple fabric leftovers.  This quilt has all 100 designs of the Tilda Bit by Bit Stash Builder Bundle, and some beloved Free Fall from Tula Pink on the back.  I couldn't be more pleased!
For binding I used Begonia candy stripe from Hawthorne Supply Co.  With all the mesh of colors a nice soft pink worked out very nicely.  And it coordinated with the swallows on the back fabric as well. Below you can see a wrinkled after washing picture of the quilting - wavy line stitch following seams on the diagonal.
This is a little bit of a departure for me since I like to show and explain the quilts I make from blocks that are often public domain.  But, I can honestly say this quilt was very fast & fun to make and worth the purchase. Best of all, I love the final look - and in another departure ... I am keeping this one for myself!

Materials:
Tilda Bit by Bit Stash Building from Serendipity Woods
The Cleo Quilt from Kitchen Table Quilting
Free Fall in Creamsicle by Tula Pink
Begonia candy stripe binding from Hawthorne Supply Co.
Warm and White batting
Aurifil 50wt. thread #2415 (light pink)
Size: 49" x 49" (after washing)
May 2021 

Sunday, May 2, 2021

A Finished Star Like Quilt

Making its debut, this Star like quilt is made with just 2 blocks -  a square and half square triangle (HST) both unfinished at 4.5".  The tutorial and diagram on how to assemble the units are in the blog post HERE. 
Simple wavy line quilting with a pale pink thread (Aurifil 50wt. #2415) on the top, and white (#2024) on the bottom.  I put a mark at each seam junction - and sewed on the diagonal to make pretty diamond shapes on the front and back. No need to mark the entire quilt but sew through the center of the squares by eye - easy peasy. 
The fabric is Regent Street Lawns 2016 by Moda, an eclectic mix of strong colors that  surprisingly harmonize when assembled.  The background fabric is Bright White Cotton Couture by Michael Miller.
As I use up my existing stash of fabric, I do treat myself to new stripped binding from Hawthorne Supply Co.  
As I get my minky from there,  its super fun to match up their vast color palette of 'candy stripe' cottons with a current project.  This bold binding is candy stripe in Petunia.  
This is a very beginner friendly quilt which really is more about accurate trimming than anything else.  Tip for this quilt is to use a Topstitch Needle size 90/14 when sewing with minky!

Materials:
Regent Street Lawns 2016 / Moda
Cotton Couture in Bright White / Michael Miller
Aurifil 50wt. #2415 & #2024
Warm & White batting
White minky & Petunia candy stripe binding printed on 56" wide quilting cotton from  Hawthorne Supply Co. 
Size: 53" x 53"
May 2021

Thursday, April 15, 2021

A Star like Quilt - with only 2 blocks!

Here's what is almost finished on the layout board today.  A simple design that consists of only two blocks and looks pretty dynamic.  A little concentration on how to position the units creates a star like look.  I made a larger, but very similar version HERE.

I am not a pattern maker but this is how I made this quilt - please forgive the rough diagram. 
The final size for this quilt is 53" x 53".  All units are 4.5" x 4.5" unfinished.  
You will need:
(64) focus fabric squares - indicated in dark blue
(25) white squares - for corners and between "stars"
(80) half square triangles - trimmed to 4.5" x 4.5"
There are many tutorials that show how to make HST (half square triangles).  I opted to begin mine a little larger than necessary and cut my HST starting pieces 5.25" x 5.25" so I could trim down. 
No matter what size you choose to begin your HST's - you will need 40 focus squares and 40 background squares.  
This will yield you the necessary (80) Half Square Triangles for the design above.
To recap you need: 
  *(64) focus fabric squares,  (unfinished 4.5" x 4.5")
  *(25) white background squares,  (unfinished 4.5" x 4.5")
  *(80) Half Square Triangles  
           made from 40 focus/40 background squares
           final trim size unfinished 4.5"x 4.5" 
           
  
I opted to sew the (16) four-patches together first - and add the HST's as a second phase.  It's all up to you.  If you layout everything without sewing the four-patches first - you can sew everything together ... row by row. 
Important Note:  If you sew the four patches together like I did above - you will need to sew SOME of the HST's together first - top to bottom.  Basically, the ones that nestle up to the four patch  See pix below. 
I was so focused on balancing all the center squares, (there are 35 different colors & patterns), I didn't think ahead to the construction phase.  
Anyway - keep laying out according to the 'rough' diagram at the beginning of the post. Enjoy seeing your quilt come alive as you arrange the 13 blocks across and 13 rows down.  This is a good time to try something simple with just two blocks that show lots of pretty colors and fabric patterns.
Materials:
Regent Street Lawn 2016 / Moda
Cotton Couture in Bright White / Michael Miller
Aurifil 50wt. Muslin thread (#2311)
Size: 53" x 53"
April 2021